Instructions for Removal of Finger Rings Using EHM (Extremely Hard Metal) Ring Cutter
Removal of Finger Rings Using EHM (Extremely Hard Metal) Ring Cutter
- Wear protective eyewear and prevent particles from entering the nose and mouth with a mask.
- Connect any power screwdriver to the Hex Drive.
- Place the finger guard under the ring to protect the patient's finger.
- Position the ring band in the notch on the finger guard.
- Use the supplied plastic bottle to dispense water on the rotating diamond disc in order to lubricate it. Keep the disc damp by constantly dripping water onto it.
- To commence cutting, power the cutting blade so that it is rotating before it makes contact with the ring.
- To make contact between the rotating blade and the ring, use ONLY GENTLE PRESSURE, and let the blade do the cutting. You will know that you are continuing to use "gentle pressure" if the blade is always rotating speedily while it is in contact with the ring. Let the resulting inertia of motion cut the ring. DO NOT THINK OF THE RING CUTTER AS A PLIER TO BE SQUEEZED.
- Make a second cut on the opposite side of the ring.
- Lift the ring off the patient's finger.
- Expect the process to take approximately 5 minutes.
- Use the Extremely Hard Metal Ring Cutter for Hard Titanium, Cobalt, Bio-Blu©, Platinum and Steel Finger Rings. Do not use it for Gold, Silver, Brass and normal Titanium rings for two reasons: 1) our Electric Ring Cutter( 48.0610) is much faster and 2) the diamond disc will fill with soft metal and will cease to cut Extremely Hard metal rings.

How to Change the Diamond Disc
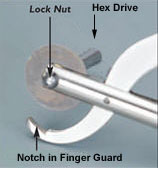
- The side of the ring cutter with the Hex Drive is the RIGHT side.
- The side of the ring cutter with the Lock Nut is the LEFT side.
- Insert the prongs of the T-Handle into the Lock Nut and remove the Lock Nut by rotating the T-Handle counter-clockwise.
- Unscrew the Hex Drive and remove it.
- Take the old Diamond Disc out of the slot in the ring cutter.
- Insert the new Diamond Disc in the slot.
- Screw the Hex Drive from the RIGHT SIDE of the ring cutter, through the new Diamond Disc and out the LEFT SIDE of the ring cutter.
- Screw the Lock Nut back onto the Hex Drive by using the T-Handle and turning it Clockwise.
Return to Electric Ring Cutter Page
- Optivisor
- Optivisor LX
- Optivisor Light
- Optivisor Lens Plates
- Lens Plate Case
- OptiLoupe
- Quasar LS Light
- Optivisor Complete Set
- Optivisor Del Sol
- Optisight
- Optivisor AL Set
- Optivisor Parts
- Electric Ring Cutter
- Ring Cutter Blades
- Ring Cracker
- Ring Spreading Pliers
- Diamond Testers
- Moissanite Testers
- Gold Testers
- Eye Loupe
- Hastings Triplet Loupe
- UV LED Triplet Loupe
- Coddington Loupe
- Loupe Lanyards
- LED Scale Loupe
- Measuring Magnifier
- Optical Measuring
- Engravers Loupe
- B&L Eyeglass Loupe
- Spectacle Loupe
- Magnifying Glass
- B&L Lenscope
- Lighted Coddington
- Quasar LS Light
- Donnegan Clip-On
- Eschenbach Clip-On
- Lens Cleaning Tissues
- Diamond Testers
- Moissanite Testers
- Cleaning Machines
- Ultrasonic Machines
- Cleaning Solutions
- Delicate Gem Cleaner
- Diamond Tweezers
- Polishing Cloths
- Silver Care Cloths
- Silver Care Polish
- Gold Care Cloths
- Contact VP Gabriel™
- Terms of Service
- Government Sales
- Payment
- Privacy Policy
- Returns
- Shipping
V.P. Gabriel, Inc.™, 2005-2014, all rights reserved
-

-